You want to know how to start a blog, but more importantly, you want to know how to start a blog and actually make money from it, right?
Well, I’ve got good news for you – you’ve landed in exactly the right place.
In this guide you’re going to learn step-by-step all of the following things:
- How To Start Your Own Blog (the right way)
- How To Configure, Customize & Post On Your Blog
- What An Email List Is, Why You Need One & How To Build One
- How To Make Money Blogging, And How To Take Your Income To The Next Level
- How To Get a Truckload of Traffic To Your Blog
- My Blueprint For Building a Profitable Blog
And the best part is that I’ve designed the guide with complete beginners in mind, so even if you’re brand new, you’ll still be able to have your own profit-ready blog live on the web come the end of it.
Sound good?
Let’s dive in then…
Step 1. How To Start a Blog
In order to start a blog (the right way), there are 2 things you’ll absolutely need – a domain name & some web hosting.
Now you might have heard that you can start a blog for free, and whilst that’s true – let me explain why you shouldn’t do it…
If you blog using a “free” blog:
- You do not own the blog – meaning it could be deleted/disabled at any time.
- You will most likely have limitations on what you can do with the blog (for example limited themes or plugins available).
- Most importantly whoever provided you with the blog will most likely put adverts on it meaning they will be making the money from the blog, not you.
I understand that can be tempting to go down the route of a free blog, because well ultimately – it’s free, but take it from me that it’s a bad move & one that you’ll no doubt only regret later on down the line.
So if you want to do things the right way, then hosting the blog yourself is definitely the way to go.
Hosting it yourself means that you can rest assured that it’s 100% yours, so you’ll have full control over it, you can do as you please with it & most importantly you will be able to make money from it.
Some people are put off hosting their own blog because they are led to believe that it’s difficult to do, but take it from me it’s not.
In fact, I’ll show that hosting your own blog is actually super easy, and can be done with just a couple of clicks.
With the help of this guide, you can have your blog live on the web in less than 10 minutes from now.
![]()
Step 1.1) Getting Your Domain Name & Web Hosting
Since we’ve established that you’re going to need a domain name & web hosting in order to get your blog set up, the next thing you’ll need to do is actually go ahead & get them.
The easiest thing to do is to get your domain & web hosting from the same place, this way they’ll already be connected for you.
If you were to purchase them from 2 different companies then you’d have to manually point your domain name to your web hosting (to tell the web browser which website to load when somebody types it in) – which can get a little bit confusing.
In order to avoid that we’ll just get them both from the same place & that way, everything will already have been done for us meaning no technical stuff to mess around with.
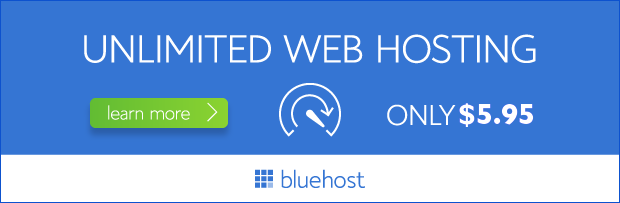
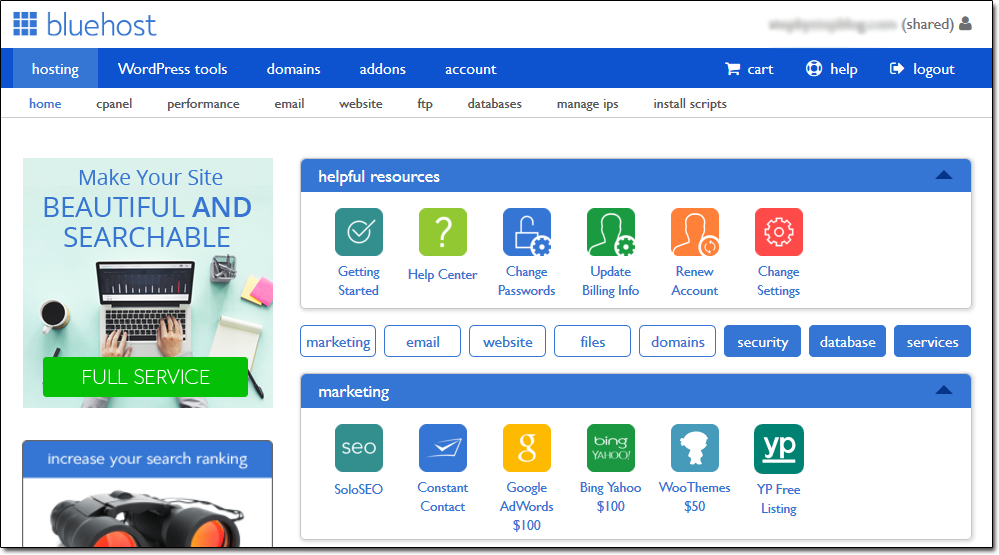
The company I recommend you get your domain & hosting from is a company called Bluehost.
Why I recommend Bluehost:
- They offer low-cost, fast web-hosting.
- You get a free domain when you get your hosting.
- Once you’ve got your hosting with Bluehost you can install your blog very easily with their 1-click installer.
- And at absolutely no extra cost to you whatsoever they pay me a small commission for referring you
Fast web hosting is very important because it helps your blog rank higher in search engines such as Google, Yahoo & Bing.
The higher your website in ranks in search engines the more visitors you’ll get, which ultimately means the more money you’ll make. That’s one of the main reasons I recommend Bluehost, because their web hosting is super-fast.
So the first thing you’ll need to do is click the big button above which will take you to the Bluehost website.
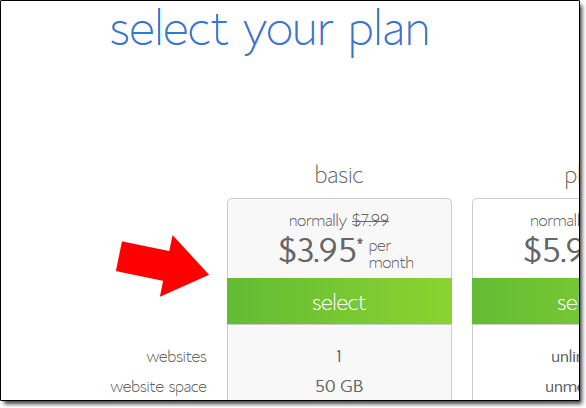
Once at Bluehost hit the “Get started now” button & you’ll be shown a choice of hosting plans
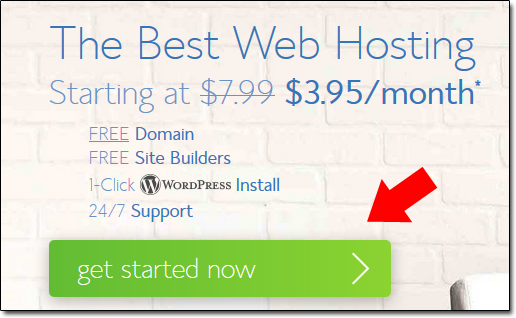
All you need to do from here is simply select the cheapest hosting plan, which is only around $3.95 per month.
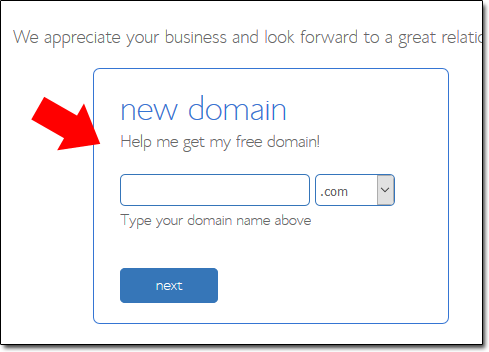
Now the important thing that you’ll need to do next is select that you want to register a new domain.
Tips for picking your domain name:
- As mentioned above, try and stick with a “.com” or “.net” if possible – they’ll rank higher in search engines.
- Ideally, your domain should represent what the website’s about.
- Try to keep it short, snappy & easy to remember.
- Avoid using hyphens in your domain name.
If you get stuck for ideas, here’s a website that will help you out: Dotomator Random Domain Name Generator.
Once you’ve decided on a domain name continue the signup process with Bluehost & create your web hosting account so that you can move onto the next step where I’ll show you how to begin installing & setting up your blog.
Step 1.2) Installing & Setting Up Your Blog
After creating your web hosting account with Bluehost in the previous step, you should have received an email containing details of how to log into your web hosting control panel.
Go ahead & dig those details out, because the first thing you’ll need to do is log yourself in.
Once you’ve successfully managed to log into your Bluehost control panel you should be presented with a page that looks somewhat like the one below:
From this page, you’ll need to look for the button that says “Install WordPress”.
WordPress is the “software” that you’ll be installing into your web hosting account which will power your blog.

After clicking “Install WordPress” you’ll be taken to a page where you’ll be welcomed to the Bluehost Marketplace, from here you simply need to hit the green “Get Started” button at the bottom of the page.
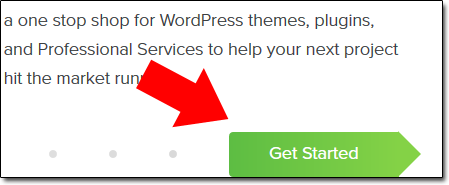
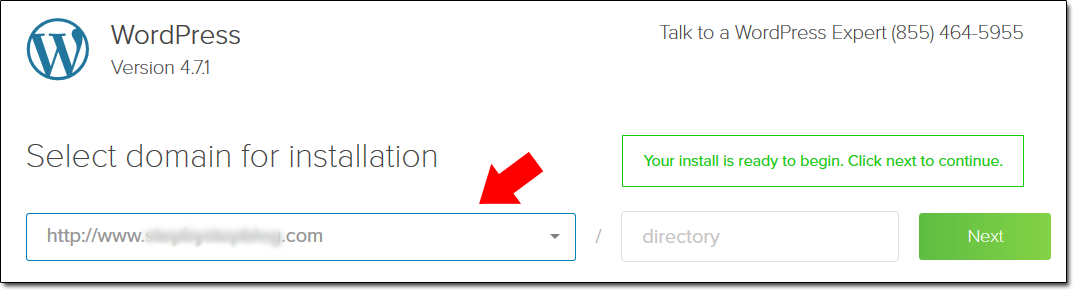
That button will take you to the initial WordPress installation page, where you’ll be asked which domain name you wish to install WordPress (your blog) on.
From the dropdown box on the left (shown by the red arrow in the image below) simply choose your domain name from the list, and then hit the green “Next” button.
You do not need to enter anything into the “directory” box – this is only to be filled in by advanced users who wish to install their blog in a subfolder on their website.
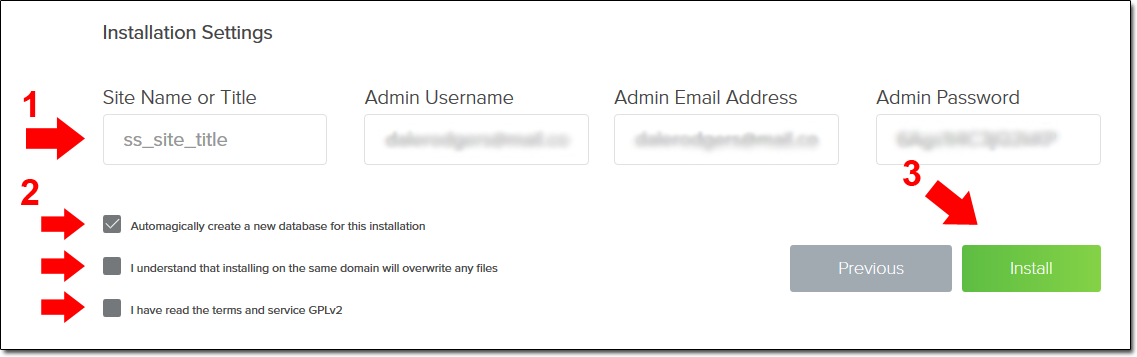
After clicking “Next” you’ll be asked for some additional settings before WordPress (your blog) will begin installing.
Firstly you’ll be asked to give your blog a title & then secondly you have the option to change the auto-generated details of the admin account.
Once you’ve made the necessary changes make sure the three boxes are checked and then simply hit “Install”. You’ll immediately be taken to another page which will show you the progress of the installation.
Give yourself a pat on the back – you’ve just installed your blog!
![]()
Yep, installing your blog really was as easy as that – you’ve now got yourself a domain name & your blog is live on the web.
The cool part is that you can officially call yourself a webmaster… Okay, maybe that’s not so cool, but hey – you did it!
So here’s what you’ll need to do next…
The important thing you’ll need to do before anything else is save your blog admin credentials in a safe place – they should have been provided to you on the page that were taken too after your blog finished installing.
Once you’ve got your credentials saved it’s time for the fun to start, because now you’re going to learn step-by-step how to login to your blog, how to configure it, how to customize it & how to publish your first post.
Step 2. Configuring & Customizing Your Blog
Click here to go back to the top
After installing your blog it’ll be pretty much good-to-go, but there are a few minor settings I recommend you tweak before you go ahead & start customizing it or adding posts.
So in order to tweak those settings the first thing you’ll need to do is login to your blog’s administration panel using the details you were provided with in the last step. Usually the admin panel will be located at yourdomain.com/wp-admin.
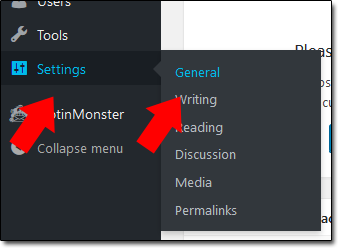
Once you’re logged in – from the menu on the left, hover over the “Settings” tab and then click “General” from the menu the appears.
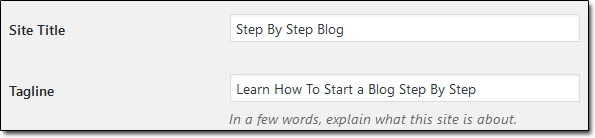
From this page you’ll need to first make sure your site title & tagline are correct (example shown below).
And then after that, from the same page you’ll simply need to disable your blog’s “Coming Soon” page so that people can actually access it.
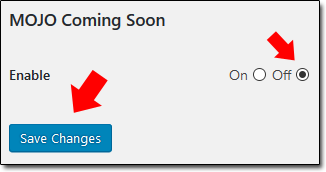
That’s all the settings on this page configured, so now you can hit “Save Changes”.
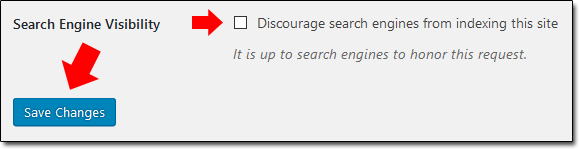
Next, from the same “Settings” menu you’ll need to this time navigate to “Reading“.
Here you’ll notice that the “Search Engine Visibility” box is checked. This means that search engines will be discouraged from indexing your blog, which is bad news because it means that you’ll be writing blog posts & nobody will be able to find them.
Be sure to uncheck this box so that search engines can access and list your blog posts, then hit “Save Changes”.
Now from the same “Settings” menu, click “Permalinks“.
Here you’re going to change a setting that will adjust the structure of your URL’s (links to your blog posts).
By default you’ll notice that they’re set to “Day and name”, but as you can see in the example it creates quite a long & untidy URL, so set it to “Post name” instead & then hit “Save Changes”.
This just makes it easier for people to remember the links to your blog posts – and it’s also preferred by search engines too.

Finally, just one last setting & then your configuration is done & you can move onto learning how to customize your blog.
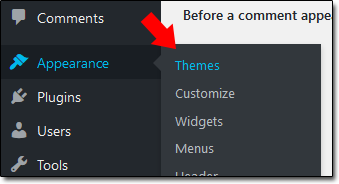
So this time, again from the same “Settings” menu, click on “Discussion“.
All you’re going to do here is change a setting which simply means that when somebody leaves a comment on your blog, you’ll be asked to approve it before it goes live. This is just a simple step that helps reduce spam or unwanted comments from appearing on your blog & being shown to the public.
So from this page, next to where it says “Before a comment appears” simply check the box that states a “Comment must be manually approved” as shown in the image below:

Hit “Save Changes” & Bob’s your uncle – your blog is now properly configured with the recommended settings & ready to go.
Step 2.2) Customizing Your Blog
– Changing Your Theme
You want your blog to stand out from the crowd so customizing it is really important, thankfully WordPress makes it super easy & with just a couple of clicks you can activate a swish new theme for your blog to get it looking the way you want it to look.
So firstly to change the theme you’ll need to navigate to “Appearance” and then “Themes” from the menu on the left.
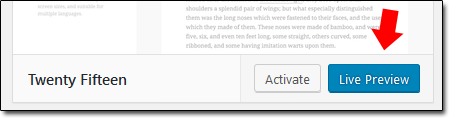
From this page, you’ll see a selection of themes which are currently installed on your blog.
You can only have 1 theme activated at a time, but by clicking “Activate” on any of these themes you can freely switch between them – and in doing so you won’t lose any of your blog posts or data (so feel free to play around).

As soon as you “Activate” a new theme the changes will immediately take place on your blog, so if you refresh it you should see your new theme live in action – if you decide that you don’t like it & you want to go back, just “Activate” your original theme & everything will go back to normal.
Switching between different themes is fine at the moment since your blog won’t have any visitors just yet – but when it does begin getting visitors you can use the “Live Preview” button to get an idea of what a theme will look like before you go ahead and fully activate it on your blog. This way you can do everything behind the scenes without affecting your users experience.
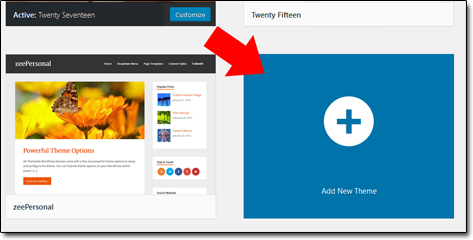
One thing you’ll notice though is that there probably isn’t a great deal of different themes already installed on your blog, so chances are you’d be interested in getting some more.
This is also very easy to do, and best of all you can hundreds more themes completely free of charge.
All you need to do is hit the big button at the end of your list of themes that says “Add New Theme“.
From here you’ll be shown hundreds (maybe even thousands) of different themes, and once you find one you like you simply need to hit the “Install” button to add it to your blog.
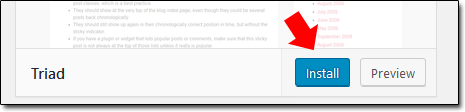
Don’t worry, it won’t go live just yet – it’ll simply get added to your list of themes that you can “Activate”.
Then, when you’re ready you can “Activate” it from within the “Themes” section of your blog.
Even if you don’t decide to activate it right away it will still stay listed within your “Themes” section because it’s now installed on your blog ready for you to use whenever you like – even if you don’t decide to use it for weeks or months later.
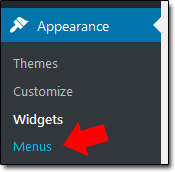
– Adding & Editing Widgets
Chances are you’re reading this wondering what the heck a widget even is – well, widgets are simply a feature in WordPress that essentially allow you to easily add bits of content to different parts of your blog.
So as an example, if you wanted to add a bit of text to the footer or sidebar of your blog – you could do this using a “Text Widget”.
Similarly if you wanted to add an up to date list of your blog’s recent posts somewhere on your blog, then you could do this using a “Recent Posts Widget”.
The cool thing about widgets is that they’re “drag-and-drop”, meaning you simply pick the widget you want to use & then all you need to do is drag it into the location where you want it to display.
To access your widgets you simply need to select “Widgets” from the “Themes” menu on the left-hand side of your administration panel, as shown in the image below:
That will take you to a page which will look somewhat like the one below:
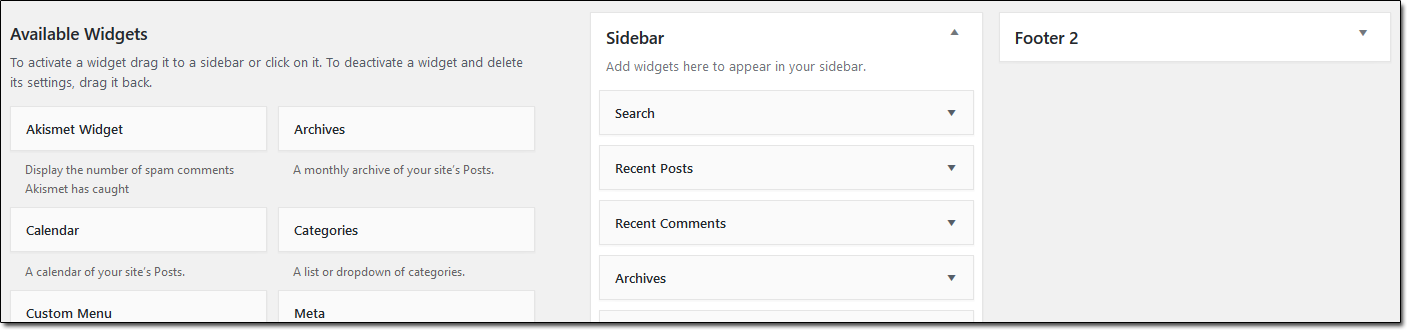
On the left-hand side, you’ll be shown your “Available Widgets” – this is basically a list of all the different widgets that you have available ready to drag & drop into the different locations on your blog.
On the right-hand side, you’ll see a list of the different locations that you have available to deploy your widgets.
So as you can see in the image above, my blog sidebar current consists of the following widgets:
- Search
- Recent Posts
- Recent Comments
- Archives
And if you were to visit my blog, this is what you’d see:
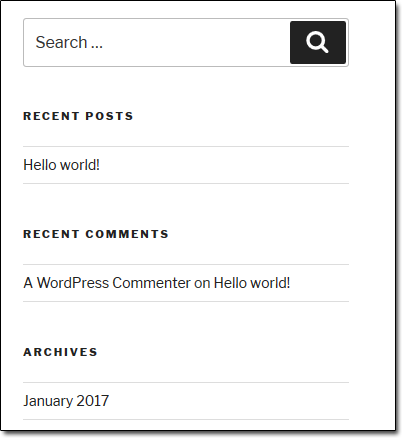
So hopefully you can see that what appears in my widget locations in my administration panel has a direct impact on what people will see live on my blog.
I can easily re-arrange them by dragging them around, and I can easily add new widgets by dragging them across from my “Available Widgets” on the left-hand side.
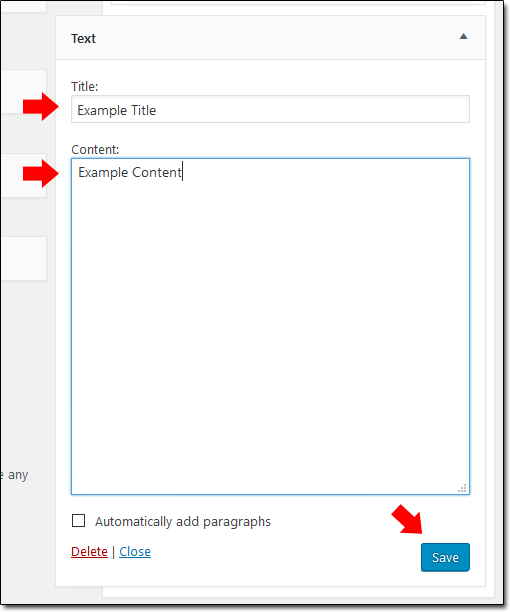
And if I wanted to edit a particular widget, for example a “Text Widget”, all I’d need to do is simply click on it, edit the contents & hit “Save”. The changes I’d made would then immediately appear live on my blog for my readers to see.
Editing widgets & re-arranging the content on your blog really is as easy as that – and if you’re wondering how you get more widgets, well they come with something called “Plugins“.
– Adding & Editing Menus
Once you’ve learned how to change your theme & add/edit widgets, you’ve pretty much learned the fundamentals of customizing your blog. The only other vital part left for you to learn now is how to add & edit menus – which is really easy to do.
The first thing you’ll need to do is navigate to the “Menus” section from within the “Appearance” menu on the left hand side of your admin panel as shown below:
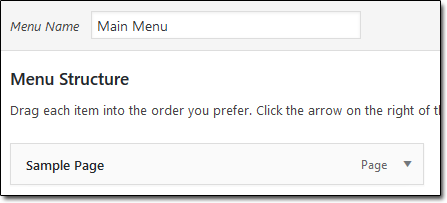
On this page you’ll need to give your menu a name (for your reference only), and then hit “Create Menu”.

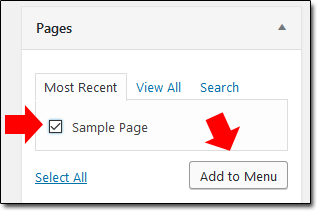
Once your menu is created you’ll then have the ability to add links to it.
You can select one of your pages, posts or categories from the lists on the left – or alternatively you can create a totally custom link.
For the purpose of this example we’re going to add a page to our menu – and to do that we’d simply select the checkbox of the page we want to add & hit “Add to Menu” as shown below:
After doing that you’ll see the page will have been added to your menu.
Click “Save Menu” and then you’ll need to choose a location for your menu to display – so scroll up and click “Manage Locations”.
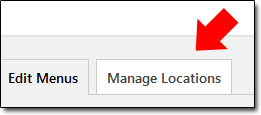
The next step is really easy, all you need to do is decide where you want the menu to display & then choose the menu you’ve just created from the dropdown box.
Once you’ve done that hit “Save Changes” and your menu will now be live on your blog in the location that you’ve selected.
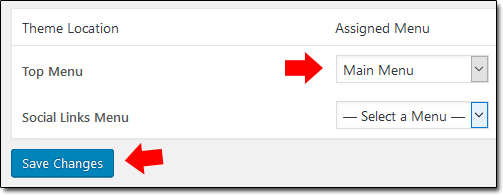
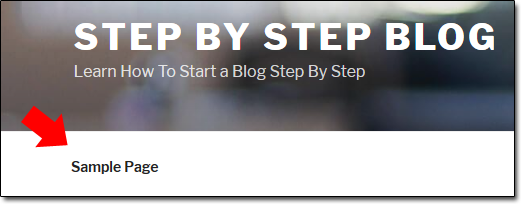
As you can see in the example above we chose to add our menu to the “Top Menu” position, and below you can see of what it looks like live on our blog:
Well done – you’ve now officially learned how to customize your blog!
Step 2.3) Publishing Your First Post
Your blog’s all set up, and hopefully now it’s customized & you have it looking the way you want it too. So at this point you’re probably eager to find out how to publish your first post, which is exactly what I’m going to run through right now in this step.
– Difference Between Posts & Pages
If you’ve had a browse around your blog’s administration panel then you’ll notice that as well as “Posts”, you’re also given the option to add “Pages” to your blog too, and I understand that this might leave you a little bit confused as to which one to use.
Basically, the difference between a “Post” and a “Page” is that by default a post will be published on your blogroll for people to read, and if any of your readers are subscribed to your blog via RSS then they’ll be notified when you add a new blog post.
However, a page on the other hand will be hidden unless you either share the link to it with somebody or you add it to a menu.
Basically, a “Page” is there for you to add information that you might not want to necessarily class as a blog post and you don’t want to update people about – such as an “About Me” page, or “Contact Me” page.
– Publishing Your First Post
Now that you hopefully understand the difference between posts and pages, let’s go ahead & publish your first post.
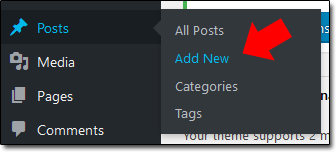
From the menu on the left-hand side of your admin panel the first thing you’ll need to do is select “Posts” and “Add New“.
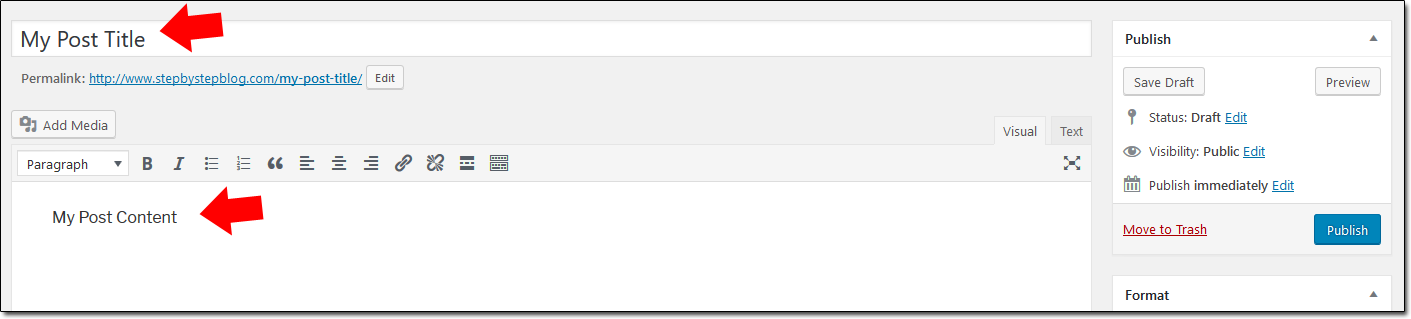
From here you’ll be taken to the “Add New Post” page where you can compose your post and then publish it, or schedule it to be published at a later date.
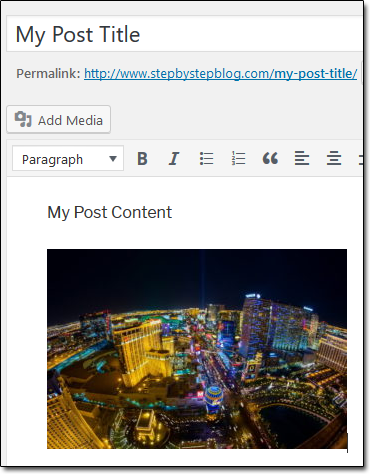
As you can see in the image below we’ve added a title and a little bit of brief content to our post:
It’s important to make sure that you’re using the “Visual” editor, that way you’ll get the toolbar at the top which will enable you to easily do things such as edit the font & add images. The “Text” alternative is really only for more advanced users who want to add HTML code to their posts.
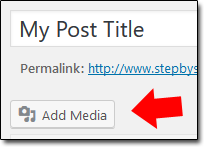
If you’d like to add an image to your post, simply hit the “Add Media” button towards the top left.
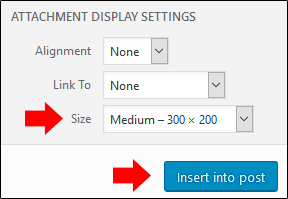
Select a picture that you’d like to upload from your PC, choose the size you’d like to display it and then simply hit the button that says “Insert into post”.
Your post should then look somewhat like the example you can see below, where we’ve added a picture of Las Vegas to our blog post:
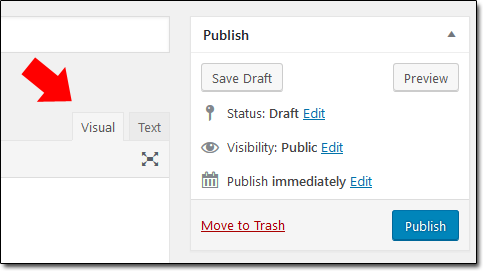
Once you’ve finished with your blog post & you’re happy with the way it looks you can hit the “Publish” button on the right-hand side and your post will be immediately added to your blog ready for people to read.
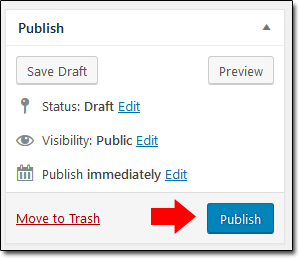
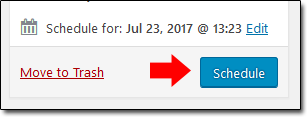
If you don’t want the post to appear right away, for example if you plan on writing 7 posts in 1 day & want them to appear 1 by 1 each day, then you can set a “Schedule“.
Setting a schedule is really easy – above the “Publish” button, next to where it says “Publish Immediately” simply hit the “Edit” button.
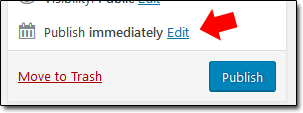
From here simply choose the time & date that you’d like your post to go live on your blog, hit “OK” and then hit “Schedule“.
– Adding Categories
Adding categories is a good idea as it helps keep your posts organized. It might not seem like too much of a priority when starting out, but it’s easier to keep everything in the right categories from day 1 than it is to move everything around at a later date when you might have a hundred or so posts.
To add a category, all you need to do is scroll down on the “Add New Post” page and towards the right-hand side you’ll see a box titled “Categories”. From here simply hit “Add New Category”, name it something relevant & make sure the box is checked before publishing your post. Now, when you publish your post it will be added into your chosen category.
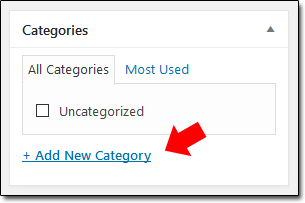
If you don’t select a category, then by default your posts will automatically be published in the “Uncategorized” category.
Well done – you’ve learned how to publish your first post, and you can now officially call yourself a blogger!
![]()
Step 3. What An Email List Is, And Why You Need One
Click here to go back to the top
If you’ve made it this far through the guide then you’re doing great – you’ve learned how to set up your blog, how to customize it & how to post on it – but there’s one big problem.
When people visit your blog & then leave – how are you going to make sure they come back?
The truth is you can’t unless you have an email list.
An email list is basically a list of people who have subscribed to your blog updates. It means that they want to be kept in the loop about your new posts, and it means that you have the ability to reach out to them all whenever you post something new.
Email lists are very powerful – and that’s why you’ll see them on nearly every single blog you visit.
Each blog will no doubt use different methods of obtaining your email address (such as a free eBooks, or access to hidden content), but ultimately they’re all doing the same thing – they’re all building their email list.
So an email list is very important, in fact it’s fair to say that it’s absolutely essential.
Not only does it provide you with the ability to bring people back to your blog, but it provides you with the ability to land your latest offers directly in their inbox. It separates those who do “OK” from those who do very well.
Step 3.1) How To Build An Email List
Building an email list is actually very simple, but there is one thing that you’ll need – and that’s an email marketing service provider, such as AWeber. You’ll need this to keep yourself compliant with the CAN-SPAM act, but also to ensure high deliverability rates (meaning that your emails actually land in your subscribers inbox – not their spam folder).
After all it’s pointless having an email list if all your email are going to go to the junk folder and nobody is even going to see them, so a high-quality email marketing service provider is essential.
I recommend AWeber, and here’s why:
- Super high deliverability rates (meaning your emails land in the inbox – not the junk folder).
- Very easy to use interface (other providers are generally difficult to navigate & use).
- Great statistics – you can track in real-time which subscribers are opening emails & what they’re clicking on.
So in order to begin building your email list, the first thing you’re going to need to do is go ahead & sign up with AWeber, which you can do by clicking the big button below:

After joining AWeber the first thing you’ll need to do is create a list, which is where all your new subscribers will be stored.
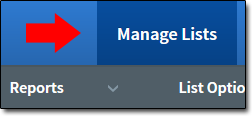
To do this, log into AWeber and click the “Manage Lists” button in the top right.
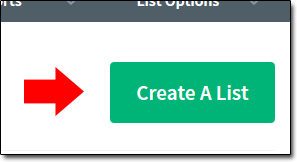
Next, from this page click on the “Create A List” button.
On the following page you’ll be asked some basic details about yourself or your company, such as your name (or company name), your website, your address & the sender name that you’d like to appear alongside your emails.
Understandably a lot of people don’t like their address being attached to their emails – but this is mandatory in line with the CAN-SPAM act, however to get around displaying your home address you can always use virtual office or PO box instead.
Then after submitting those details you’ll be asked for some basic details about the list itself, such as the list name & a short description.
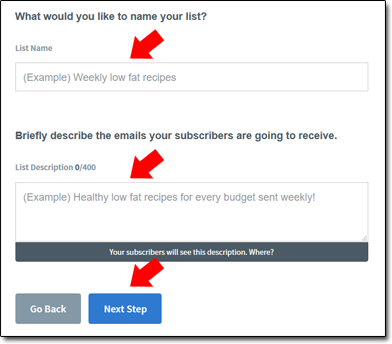
Be mindful that your subscribers will be able to see these details about your list – and once you’ve finished populating hit the “Next Step” button which will take you to a page asking for details about your confirmation message.
The confirmation message is a message that gets sent out to somebody when they subscribe to your list – it’s basically just to confirm that they did actually subscribe, and that they want to receive email from you.
It’s possible to switch this off, but it’s best that you leave it on because it helps protect you from being accused of sending spam (unsolicited mail) to somebody.
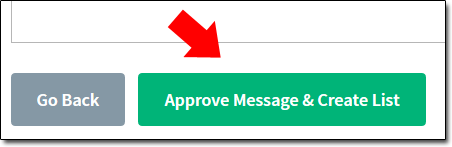
Usually, the details on this page are just fine as they are, but if you want to customize them then you can do so as you see fit – but once you’re done, be sure to hit the big “Approve Message & Create List” button located at the bottom of the page.
Once you’ve done that, bazinga – your list is now created & you’re ready to begin getting subscribers.
– How To Get Subscribers
To get subscribers all you need to do is simply add a subscription form(s) somewhere onto your blog.
The more forms you have dotted around your blog, the more likely you will be to get subscribers – but you don’t want to over-do it and ruin their experience, therefore, keeping a happy medium is advised.
The question you’re probably asking though is how can you get a subscription form (known as an opt-in form) onto your blog?
So let us show you, step-by-step…
Firstly you’ll need to make sure the list that you’ve just created is selected from the drop-down menu at the top of the page (inside your AWeber control panel), and then you’ll need to click on “Sign Up Forms“.
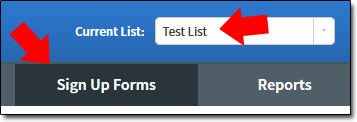
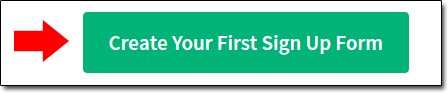
On the next page simply hit the big button that says “Create Your First Sign Up Form“.
This will take you to a page from which you can design your form. You can make the changes yourself using the editor, or you can select from a variety of pre-styled forms.
You’ll also have the option to add & delete fields from your form – obviously as a minimum you’ll need the users email, but you can add other fields such as name, phone etc…
It’s worth noting though that the more form fields you add, the less likely people will be to subscribe to your list.
We recommend just asking for the users email address, or their name & email at most. Generally people don’t really want to give away much more information than that to somebody they’ve just came across on the internet (as you can probably understand).
Once you’re done creating your form, hit “Save Your Form” and then “Go To Step 2“.

On the next page you’ll be asked for a few details about your form, such as what you’d like to name it (for your reference only) and which thank-you page you’d like to display when the user subscribes.
You can use the AWeber default thank-you page for now, but it’s recommended that you add a “Page” to your blog & use your own custom thank-you page to give the process a personal touch – this way your subscribers will feel better engaged with you.
After inputting the details on this page, hit “Save Your Form” once more and then click “Go To Step 3“.

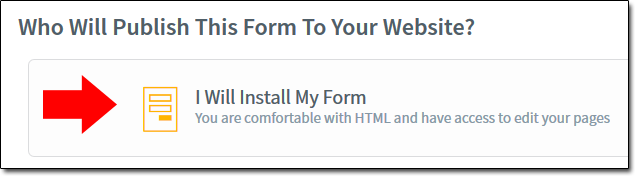
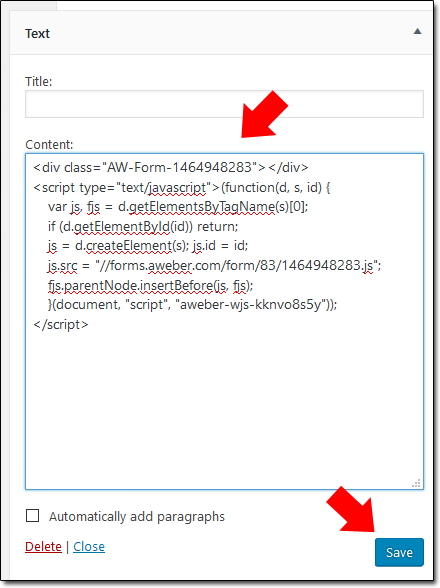
You’ll then be taken to a page where you’ll be presented with a variety of different ways that you can deploy your newly created opt-in form, but the one you want to select is “I Will Install My Form“.
Once you’ve hit that button you’ll be presented with some code – it may look like complete gobbledygook to you, but don’t worry, thankfully all you’re going to need to do is copy & paste it into your blog.
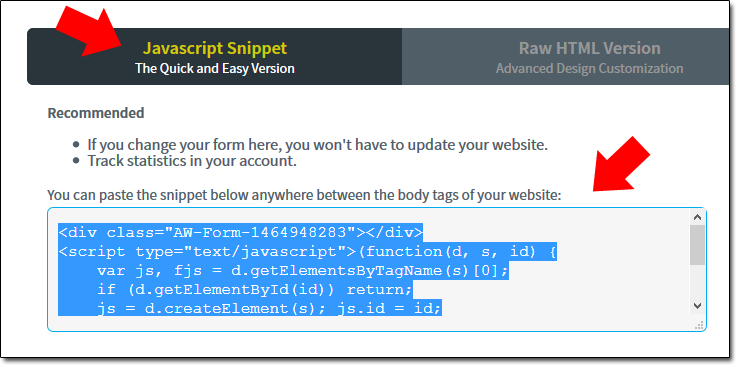
Be sure to copy all of the code in the box, and then head over to the widgets section of your blog.
Select a “Text” widget & drag it into the location of where you want your opt-in form to display (e.g. your sidebar).
Finally, all you need to do is paste the code that you copied from AWeber into the text widget that you’ve just dragged over, and then hit “Save“.
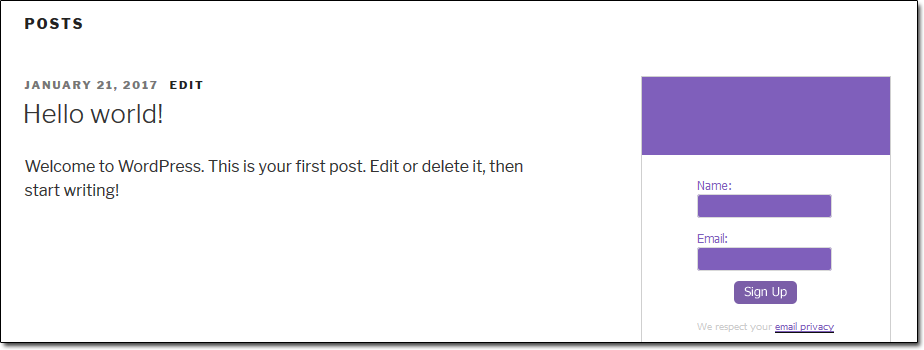
Boom! Your opt-in form should now be live on your blog, ready for your subscribers to do their thing… and subscribe.
You’ll find an example below of what you should expect to see (though yours will differ depending on how you styled your form & where you decided to place it).
Step 3.2) How To Send An Email To Your Email List
You could have the biggest email list in the world, but it’s not going to be worth a penny if you’ve got no idea how to email any of your subscribers, so that’s what we’ll discuss next.
You’ll be glad to know that sending a broadcast to your whole list is really easy & can be done in just a couple of clicks.
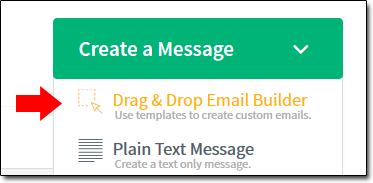
The first thing you’ll need to do is hit the “Create a Message” button from your AWeber dashboard & then select the “Drag & Drop Email Builder” from within the menu that appears.
The editor will open up, and from here you’ll be able to set your email’s subject line & add the message content.
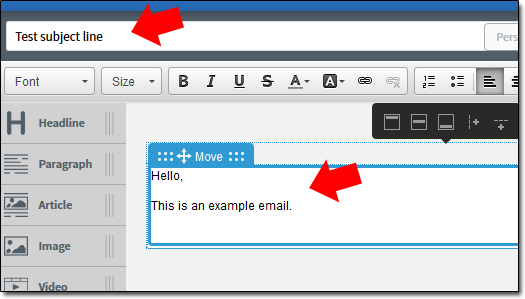
You can use the editor to do all sorts of different things like add images, videos, social buttons & more.
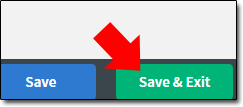
Whatever you decide to do, once you’re happy with your masterpiece hit the “Save & Exit” button at the bottom right of the editor.
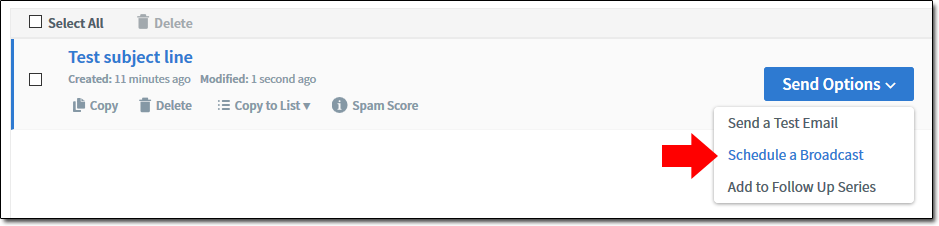
Clicking that button will take you to your “Drafts” page, where you should see the email you’ve just composed & you should also see a button next to it titled “Send Options“. Click on “Send Options”, and from the drop-down list that appears select “Schedule a Broadcast“.
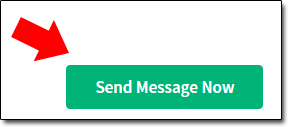
A popup will appear which will ask you to configure the settings for your broadcast. If you don’t change anything, then by default the email will be immediately sent to all of your subscribers. If however you don’t wish for that to happen, you can alter these settings to adjust when the email gets sent and who it should be sent to.
Once your happy with your broadcast’s settings you can hit the “Send Message Now” (which will change to “Schedule For…” if you’ve selected a different date) and your email will be sent to your subscribers accordingly.
Forget blogger, you can pretty much call yourself a guru now!
![]()
Let’s just take a look at some of the awesome things you’ve learned so far…
- You’ve learned how to get a domain name & web hosting.
- You’ve learned how to install a blog, configure it and customize it.
- You’ve learned how to publish your first blog post, and the difference between posts & pages.
- You’ve learned why an email list is so important & how you can build one.
- And you’ve learned how you can reach out to all of your subscribers with the click of a button.
Now it’s time for the exciting part – you’re about to learn how you can make money from your blog.
Step 4. How To Make Money Blogging
Click here to go back to the top
There are a whole bunch of different ways that you can make money from your blog, but generally these are the most common methods:
- Paid Advertising
- Affiliate Marketing
- Creating & Selling Your Own Products
- Membership Fees / Premium Content
Those methods are the most popular because they are easily scalable, and can be scaled to an infinite size since they are passive and don’t require an input of your time. Once they’re set up & in place it’s a case of more visitors = more money, as opposed to more effort.
Sure there are a bunch of other different methods you could make money from your blog too such as offering out services like coaching, graphic design & copywriting, but the problem with these is that since they directly require your time they’re more difficult to scale because ultimately you only have 24 hours in a day.
Yes it will still mean that more visitors = more money, but at the same time you’ll have to either put in more effort or raise your prices & limit your amount of clients.
Hopefully, that makes sense!
The bottom line is that as a newbie it’s generally best to start out with something like paid advertising & affiliate marketing until you find your feet, and then as your blog builds a following you can begin introducing additional income streams as you see fit.
A common route people generally tend to take throughout their “making money online” career seems to be starting out with paid advertising & affiliate marketing, then launching their own product & eventually landing up in coaching teaching others what they’ve done & how to do it.
That’s the typical journey of the average internet marketer (aka “make-money-onliner”) heh. ?
It usually looks somewhat like this (timescales are just averages and can vary massively):
- Year 1 to 2: Start your blog, add paid advertisements & affiliate links. Publish new posts consistently, build a following, build an email list & begin generating a healthy income through your various affiliate/advertisement income streams. As time goes on things start to get more passive, meaning you can free up more of your time.
- Year 2 to 4: Create your own product (virtual or physical). By this point, providing you’ve been keeping consistent with your blog & publishing posts regularly then it’s income will have probably became a little more passive meaning you’ll most likely have more free time on your hands. This is when you’ll probably end up looking into creating a product of their own (whether it be physical or digital), and then even going on to leverage affiliates for yourself to promote your own product. By this stage you’ve pretty much “cracked it”.
- Year 4+: End up coaching others how to do what you’ve did. The internet is FULL of people looking to learn how to build a business online, and so once you’ve been through the journey yourself & gained the experience and knowledge then you’ll probably get people coming to you asking for advice. As a result of this a lot of people end up offering a high-ticket coaching service to supplement their now fairly passive blog income.
I’m not saying you will take the same journey, but it’s a journey many take and ultimately that’s because it’s a proven & profitable model.
So what you’re probably wondering now is how you can get started, which is exactly what I’m going to walk you through next…
Firstly I’ll run through paid advertising with you, then I’ll run through affiliate marketing & after that I’ll take you about the additional methods too.
Step 4.1) Making Money With Paid Advertising
It’s probably safe to say that paid advertising is one of the easiest ways to start making money from your blog, since all you need to do is add the adverts to your blog & you’re good to go. You’ll either get paid a fixed amount for the advertising, or you’ll get paid for each person that clicks on the advert or each time it’s displayed to a user.
The biggest choice you’ll need to make is whether you want to manage the advertising yourself, or whether you want to use a 3rd party company to do it instead.
It’s generally best to use a 3rd party company until your blog grows to a substantial size where you might be able to get more competitive rates by working with advertisers directly. It’s also much easier to use a 3rd party company too since they handle all the advertiser communication & bidding on your behalf.
– Google Adsense
One of the most popular & most trusted advertising networks out there for you to use on your blog is Google Adsense.
This is a service which as you probably guessed is provided by Google themselves. They do have fairly strict policies as to who can & can’t enter their program, but if you’re accepted into it then you’ll no doubt find it to be a fairly lucrative means of monetizing your traffic.
It’s also pretty easy to use too since all you need to do is add a bit of code to your blog & the ads will start displaying automatically, then you can track your statistics & earnings from the Adsense dashboard.
For people looking to make money from paid advertising, this would definitely be the top network that I recommend you join.
– Media.net
If for some reason your website/blog doesn’t happen to be approved by Google Adsense then don’t worry, as there are some alternatives you can use instead.
Whilst I would choose Google Adsense over other programs, I’d recommend Media.net as the second-best alternative.
Media.net is part of the Yahoo! and Bing network, so it’s safe to say that they’re a reputable company. One of the advantages of Media.net over Adsense’s other competitors is that Media.net offer a 100% fill rate on your advertising positions. This basically means that no matter how broad your website or niche is, they’ll always find an advertiser for your content.
– Chitika
I’d be worried if your blog didn’t get accepted by Adsense or Media.net, and I probably suggest you look for a problem closer to home before applying to other networks. However, if you’ve burned your bridges with both of the other companies then you could always try out Chitika which is another large player in the paid advertising niche.
The good thing about Chitika is that there’s no restrictions on the size of your website or the amount of visitors you have – they’ll be happy to consider adding you into their network even if your blog is literally brand new.
– Managing The Adverts Yourself
If you want to manage the adverts yourself, you could literally do this by arranging advertising costs & duration directly with advertisers, or alternatively you could use a platform like BuySellAds to manage them instead.
Personally I’d recommend using a platform like BuySellAds and there are 2 main reasons why.
Firstly, using a platform like this makes it easier for the advertiser – they can immediately see what positions you have available & what your rates are. Making your advertisers lives easy will most likely result in more requests for advertising.
Secondly, it makes your life easier. If you were handling everything directly & switching the ads round yourself then this would take up quite a bit of time on your part. With a service like BuySellAds the system will automatically rotate the ads for you & run them for the purchased duration without you having to worry about it or set reminders to take them down & switch them up.
– Placing The Adverts on Your Blog
The amount of money you make from paid advertising will depend on 4 things:
- How many visitors your blog gets
- How relevant the adverts are to the content
- The locations in which the advertisements have been positioned on your blog
- How well the adverts stand out (or blend in).
The first one is obvious, the more visitors your blog gets the more money you’re going to make from advertising. Advertisers want eyeballs on their offers & the more you give them the more they’re going to pay you – that’s the whole premise of advertising.
Secondly, making sure that the adverts are relevant to your content will help to dramatically increase your earnings. If somebody arrives at your blog looking to find out how to fix a problem with your car & an advert appears with an answer to the problem then chances are they’re going to click it. Relevant ads will increase your click-thru-rate which will in turn increase your earnings.
Thirdly, it’s important to think about the locations of your adverts because in order for them to be effective they’ll need to be positioned in prominent locations where people can actually see them, and multiple locations often works best. A great tool to help you determine where the best locations could be on your website is the Crazy Egg heatmap – this will help you see where your visitors are clicking, and will help you locate the “hotspots” for your ads.
Lastly, for your adverts to be effective they need to grab the users attention. Typically people think this means they must be bright coloured and stand out, but often ads that are blended in can have just as good, if not higher success rate too. This one is definitely a case of trial & error, and figuring out what works best for you. Try out a few different options & narrow down the best performing.
Step 4.2) Making Money With Affiliate Marketing
Affiliate marketing still involves promoting products & services, but the way in which you’ll be rewarded for doing so differs to that of paid advertising.
With affiliate marketing, as opposed to getting paid a fixed amount, or getting paid for clicks or impressions, you’ll be getting paid a commission whenever you get a visitor to complete an action.
The actions you can get paid for vary, but generally, you’ll be rewarded for things like getting people to sign up to something or getting people to make a purchase.
Just like the actions vary, the commissions you’ll get paid for getting people to complete them will vary too, as some companies pay fixed amounts for the actions & some pay percentages of the final sale value. Generally percentages are the better option, but it depends what your promoting & the volume of traffic you’re generating.
The great thing about affiliate marketing is that as opposed to being restricted to earning from your blog alone like with paid advertising, you have the opportunity to earn directly from other channels too such as social media & of course the big one – your email list. This is because the companies you’ll promote will issue you with a special tracking link which will track all the sales to you, regardless of where the user happened to click the link from.
So even if the user clicks the link in an email you sent them, the sale will still be tracked to you – which is why affiliate marketing & email marketing is such a powerful combination. Sure, you can generate sales directly from your blog, but your blog should be primarily seen as the vehicle for getting subscribers onto your email list, because your follow up emails will be where the real money is made.
When it comes to making money online – the fortune is in the follow up.
Getting started with affiliate marketing is really easy, and there’s a whole bunch of different networks that you can join to begin promoting things right away.
It’s worth mentioning too that not every company runs their affiliate program through a 3rd party network – some companies operate their own programs in-house.
If you’re looking for an affiliate program of a specific company and you can’t find them listed within a network all you need to do is run a Google search for “company name + affiliate program” like so:
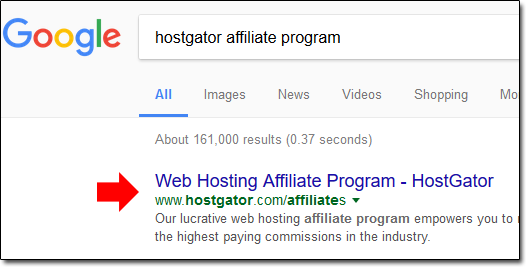
Though I’d recommend exercising caution when working with a company directly as it’s been known for companies to shave off some of their affiliates commissions. This can still happen via a 3rd party company, but since there’s a middleman involved when you’re working through a 3rd party you can be reassured that you have a bit of protection – when you work directly it’s just a case of your word against theirs.
Here’s a handful of some of the largest affiliate networks that are home to thousands of companies & brands…
– Commission Junction
Commission Junction, or CJ as it’s often referred to is one of my favourite affiliate networks. To be completely honest there’s no particular reason why, it’s just a company I’ve been using for years & have never had any problems with.
They have thousands of advertisers, they have a good tracking platform & most importantly for me they always pay in full & on time.
– Amazon
Amazon is one of the (if not the) largest affiliate programs out there. Depending on your website, it can prove to be a pretty lucrative program & there’s many thousands of people making a full-time income purely by promoting Amazon products alone.
The awesome thing about promoting Amazon is that you have access to an amazing array of products you can promote – however there is a downside, and that’s the fact that their tracking cookie only stays active for 1 day. This means that if somebody clicks your link they’ll need to make a purchase within 24 hours for it to be tracked to you – unlike most other affiliate programs which run 30-day cookies.
– Clickbank
If it’s digital products that you’re looking to promote then Clickbank is generally the go-to network for that. They offer thousands of digital products to promote across hundreds of different niches, with some of the products in their archives paying out crazy commissions.
When it comes to Clickbank though I would definitely recommend checking out products first hand before promoting them as I’ve come across a few dodgy offers on there. It’s all about scouting out the great offers for your audience, as opposed to getting caught up looking for the ones that’ll give you the highest EPC’s (earnings-per-click).
– ShareASale
ShareASale is a popular network with a solid background, plenty of offers & pays out on time I personally don’t really promote a great deal through ShareASale but that’s not because of the platform itself – it’s just because the majority of companies I work with all run their affiliate programs through other networks.
Step 4.3) Alternative Ways To Make Money Blogging
Sure, paid advertising & affiliate marketing are 2 awesome ways to make money from your blog – but they are by no means the only ways.
One alternative way you could make money from your blog is by creating & selling a product yourself. This could be a digital product, such as an eBook, or it could be a physical product instead.
Admittedly it will take up more of your time to create a product than it would if you were to market somebody else’s, but by selling your own products you’re able to achieve much higher profit margins & you could even go on to leverage affiliates to help you promote it.
Another simple idea is to add a membership area to your blog or charge a fee for premium content.
You’d need to provide your paying members with huge value in return for their money, but if you have something unique to offer (such as a some kind of helpful tool) then this could definitely be an easy way for you to monetize it.
If you’re running your blog on WordPress then there are many different plugins out there which will easily enable you to turn your blog into a membership site or charge a fee for access to certain bits of your content. One of the most popular WordPress membership site plugins is MemberPress – and you can use that very same plugin to restrict access to content for non-paying members too.
On top of that you have the option to leverage your blog as a traffic source & offer real-world services to your visitors, such as graphic design, copywriting, or well, pretty much anything you can think of. As an example, if you were a lawyer you could simply use your blog as a leveraging tool to attract people looking for a lawyer, and then offer your services to them. This way you’re basically getting advertising for your business, but paying for it with your time (by blogging) as opposed to money.
You’re a money-making machine!
![]()
Step 5. How To Get Visitors To Your Blog
Click here to go back to the top
You can blog all day long, and you spend countless amounts of hours monetizing your blog – but if nobody is visiting, then you’re not going to be making any money.
So let’s take a look at how you can get some visitors to your blog (and thankfully it’s really easy)…
– Share Your Posts on Social Media
The first thing you should absolutely & undoubtedly be doing is sharing your posts on social media. Social media is a very powerful tool and it can help you get maximum exposure to your blog posts.
Whenever you add a new post to your blog, share it on social media & let your followers know about it. Similarly, you can also use your social media channels to re-purpose your old content that may have fallen away into the archives of your blog. Dig it out, dust of the cobwebs & get it shared.
The other great advantage of sharing your content on social media is that it can help it rank higher within search engines, meaning you’re pretty much killing 2 birds with 1 stone. Social media traffic plus search engine traffic equals happy days.
You see search engines use social data to help determine the quality of a blog post. If a post has a lot of interaction on social media then the search engine can assume that it’s a quality post & has created quite the talking point, so it’ll be more inclined to rank it higher up in its search listings.
Social media signals are only 1 part of the search engine’s vast ranking algorithms & it doesn’t quite mean that a lot of social shares or likes will get you straight to the top, but it’ll certainly help you out so after you post, remember to share.
– Share Your Posts With Your Email List
From the moment you get your first subscriber, make sure you are keeping him/her updated with your blog posts.
You are building an email list for a reason, and that reason is to engage them with your blog & ultimately make more money – so be sure to do it.
Each week you should be sending out a roundup of your most recent posts as an absolute minimum.
If you send a truckload of traffic to your blog from your email list then chances are somebodies going to end up sharing your post on social media, which brings up back to point #1 of helping your website rank in search engines.
– Put Your Content To Work For You
I see it all too often – people putting together posts of 300 words or less and wondering where all their visitors are at.
When you’re starting out, 300 words can seem like a lot – and admittedly as a newbie, it’s quite an achievement, but unfortunately, it’s just not going to be enough to compete against all of the other humongous articles that are out there on the interweb.
Therefore, I always recommend people focus on building 1 power post as opposed to a bunch of small ones and put their content to work for them.
Whatever your niche, all you need to do is create an awesome post – and I don’t mean half-awesome, I mean awesome. Search engines love awesome, so if your posts packs a punch guess where it’s going to go? You guessed it – all the way up!
So if you takes you a week, a month, or even a year – focus on creating power content as opposed to poor content. Rome wasn’t built in a day.
Power content will get more social shares, it’ll rank higher in search engines & it’ll just flat-out get you more visitors.
– Advertise
I can understand that the last thing you probably want to do is throw money at your blog, especially if it’s at a stage where it hasn’t made you any back just yet.
However, paid advertising can be the perfect way to gain some initial momentum for your blog & get it off to a flying start.
You see you might have written the worlds most awesome piece of content, but if you’re relying on free traffic methods to bring people to it then no matter how great it is it’s still going to take a while for people to come across it.
Paid advertising can provide you with a way to quickly get targeted eyes on your content, and if your content is truly awesome then the visitors will begin to share it & as the free traffic begins to build up, you can taper the paid advertising spend down.
In some cases paid traffic can actually offer a long term solution, providing you’re earning more than your spending (obviously) – and the awesome thing about paid traffic is that it’s very easily scalable.
Once you’ve nailed a paid advertising campaign, if you want to earn more then all you’ve got to do is spend more, since in most cases it’s directly proportional. I’m sure you can appreciate that it’s easier said than done, but it’s definitely possible.
Step 6. My Blueprint For Building a Profitable Blog
Click here to go back to the top
Hopefully by this step you’ve learned how to actually do all the different things, like start a blog, build an email list, make money & generate traffic, but you might still be confused as to where to start & how to connect the dots, so in this step, I’m going to share with you my blueprint to building a profitable blog.
– Picking Your Niche
Most people (in fact, nearly everybody) will advise that when you’re looking into starting a blog & making money by blogging that you first choose a profitable niche.
It seems like sound advice because you want to be where the money’s at… But the truth is it’s not technically the best advice.
Instead, you need to find a happy medium.
You need to think of a subject you enjoy, and know a fair bit about, but at the same time, you want to pick a subject where there’s money to be made.
Don’t get solely caught up by the money, because yes it’s true that certain niches are more profitable than others, but if you have no idea what you’re talking about when it comes to those particular niches then you’re not going to make a dime.
At the same time, if you’re writing about something that you don’t really enjoy purely for the sake of the money then chances are you’re going to end up losing motivation & give up. You might feel all fired up right now & think that there’s no way that will happen, but trust me as a blogger you go through some testing times & it can be very hard to keep yourself going. If you don’t care for your blog or it’s subject then the chances are you’re not going to care too much about keeping going.
So as opposed to just focusing on something profitable, you need to find a niche your passionate about & one that you feel you can excel in – because ultimately you want to stand out as an expert in the field, and you want to be the go-to-blog on whatever subject it is you decide to blog about.
Blogging for a living is cool, but it’s even cooler when you enjoy it.
So the first thing you need to do is pick your niche – aka what it is you’re going to be blogging about.
– Deciding How You’re Going To Dominate
In order to become truly successful as a blogger you’ll need to stand out as an expert in your niche, and you’ll want your blog to be the go-to-blog for anybody looking for information on whatever it is you’re blogging about. Whatever a visitor comes to your blog looking for, they should get – and more.
The thought of standing out as an “expert” might sound a little daunting, but it’s surprisingly easier than you might think.
Even if you know very little about a subject, there’s still a lot more you know about it than somebody else – which in their eyes defines you as an expert.
So it’s not necessarily about how much you know – it’s about how well you provide the information that you do know.
Therefore after deciding what it is you’re going to blog about & setting up your blog, the next step is to dominate…
And guess what? It’s actually pretty easy.
The first thing you’ll need to do is simply dig out the big players who are already dominating your niche – which is pretty easily done with a quick Google search.
Search for terms relating to whatever it is your blogging about and make note of the most awesome & most popular websites.
Next, all you need to do is simply find out what it is about those blogs that are making them stand out & attract so many people.
You could try & figure this out by yourself if you wanted to, or you could use an awesome tool like SEMrush which will dig out a blogs most popular content with just a matter of a click. SEMrush is one of the most powerful tools you’ll ever come across when it comes to building a successful blog.
So drop the URL’s of your niches top players into SEMrush and figure out what their most popular content is.
Then, all you need to do is better them.
Seriously, that’s it – that’s the “secret” to becoming a super successful blogger… Finding a blogger who’s already successful and going one better.
Study their popular posts and make note of how you could make it better – then go ahead and do it.
Publish an even awesome-er version on your blog & dominate your niche.
– Keep Consistent
Power posts are awesome, but they can take a long time to put together & so in between them you must always be sure to keep bringing fresh content to the table to keep your subscribers happy, and subscribed.
In my eyes, a blog post of less than 1,000 words is low quality. I know that you can provide value to the visitor in many less words, but I always believe that you should go above & beyond. Therefore whenever your publishing your in-between power post content be sure to keep it 1,000 or 2,000 words as an absolute minimum.
Some people suggest you should blog daily, and if you can then great, by all means, do it. However, not being able to blog daily isn’t the end of the world & pushing out as much as 1 quality post per week is still a respectable achievement.
The bottom line is that you just need to make sure you’re doing all that you can to keep your blog up to date because consistency is one of the biggest factors in helping your blog to become successful. Nobody wants to follow a blog that never gets updated.
– Let Money Be a Side Effect
I’ve seen many blogs that should be very successful, but aren’t, and it’s because they’re all making the same big mistake – they’re chasing money, not trust.
Making money should be thought of as a side-effect, and never a primary focus.
If you build something purely with the intent of making money then more likely than not, it will fail.
Instead, you should focus on providing massive value to your visitors, gaining their trust & only ever promoting or advertising something when it will truly help them.
This might sound like a silly approach, but believe me, it works – and this way you’ll have people genuinely looking forward to visiting your blog or receiving emails from you and seeing what there is to buy.
People will even reach out to you and ask you what you recommend because they trust your opinion.
You’re no longer a sleazy salesman – you’re an expert, and people will want whatever it is you use or recommend.
So build trust, offer massive value & the money will find it’s way to you.
– Reach The Ultimate Goal & Launch Your Own Product
Can you see success as an affiliate without having or selling your product? Sure you can.
But as an affiliate what you must always remember is that whilst your efforts might be lining your own pockets, they’re lining somebody else’s too.
Whoever has created the product or service that you’re promoting has the ultimate leverage. They’re making money off the back of your efforts.
Therefore, as a product creator, you have the opportunity to leverage other people’s efforts & this is what will help take your income to a completely new level.
Now obviously you can’t just launch a duff product and expect to sit back & make millions – your product has to provide value to the marketplace.
And right now you might not have a clue as to what product or service you could create, but that’s absolutely fine – most people don’t, but that doesn’t mean you’ll never end up creating one.
You see the development of products & services comes from experience. As you focus more on your blog & get closer to your niche you’ll find there are long-winded ways of doing things, and you’ll no doubt find easier ways to do them – which is when you’ll have your “aha” moment & launch a product to the marketplace.
All a product or service needs to do is make somebody’s life easier – if it does that, then you’ve nailed it & you’ve reached what I like to call the “ultimate goal”.
Build a blog, build a following, offer value, get money. Simple.
Wrapping it up…
I really hope that you enjoyed this guide & that it provided you with value. The truth is that building a successful blog isn’t actually all that difficult – the hardest part is finding the willpower to stick at it, and then finding the motivation to publish posts even when there might be no direct reward.
The reason most people fail is simply because they either give up or don’t put as much time & effort into writing their posts as they really could do.
As you can imagine, there’s a lot of great content out there on the web, and to be able to beat it you must be prepared to put in the hours. Blogging can be a great way to make money, and it can certainly make you a lot of money too – but you must always remember that it’s not magical and that it does definitely require work.
I think the most important thing you could possibly do to become successful at blogging is to approach it with a long term vision.
If you are expecting to make X amount within 1, 2 or 3 months then you’ll most likely be setting yourself up for disappointment. However, give yourself a 12 month, 36 month or 5-year goal & you’ll probably be pleasantly surprised.
So thanks for reading, and please do feel free to leave a comment below – let me know what you thought of the guide, and any ways in which you think I could improve.

Hey Dale, this has be to be one of the most complete – end to end, wall to wall, soup to nuts – guides to make money blogging I have ever seen online.
Thanks buddy, really appreciate your comment! Glad you enjoyed the post 🙂
I second that! Thanks, Dale!
Hi Dale,
Are you still blogging? I haven’t seen a new post on here for a long long time!
Hi Daniel – I sure am, my last post was published just 3 days ago & the blog has been pretty active. Try refreshing your browser, maybe your PC has stored a cached version of my site or something for some reason. 🙂
Hi Dale, am super excited on bumping into your website. You’ve given me an amazing guide to start my blog which am yearning to do but have no guide. Thanks a lot, I really appreciate. Let me start creating my blog immediately.
Thanks for the comment & you’re very welcome – I hope you find the guide useful 🙂
This is good I hope to get started soon too
I’ve enjoyed the valuable content of reading about your blog and how to generate cash flow from it. And also list building and keeping them coming back for more.
Hi Dale, am so glad I landed on your site. It’s very helpful for beginners like myself. I can’t wait to start my blog but can one have several blogs or can you post about different things on the same blog e.g health, beauty and fashion?
You can have as many blogs as you like – and technically you *can* post about different things on your blog, but it’s not recommended. You should always make your blog as targeted to one topic (niche) as possible to make it easier to produce more relevant content for your audience.
Thanks Dale, please help me with the right order to follow as I want to start affiliate marketing. Is it signing up as one, starting a blog or creating a website? Thanks
If you would like to follow a step-by-step process, I’d highly advise you go through the Wealthy Affiliate training.
Hi Dale!
I’m so glad I found your review on Fullstaq, which led me to look at more of your featured stuff! I am a single mom of 2 amazing special needs young men. I have been out of work do to the pandemic and schools closing, since I can’t leave my kids unsupervised, lol. Thank you for actually showing step by step how to do these things! I don’t anticipate a lot of one parent households being able to support themselves and their families if things continue this way. Having someone who truly GIVES you info on how to make money from home is amazing! Thank you!
Wow that’s an awesome comment, thanks Jamie – I’m really glad you found my guides useful 🙂
I don’t think thats a good idea for me
What isn’t?
Hi Dale! Your website and blogs are AMAZING! ♥ Thank you so much for all that you do! ♥
It seems like every blogger has a how to on how to become a blogger (Right). I have read them all because I have been researching on how to start a blog well – for far to long.
(I just need to take the plunge!) Your post to put it in your own words was a POWER POST.
By far the most thorough I have come across. I like that you were so exhaustive and finding the angle other bloggers left out. Now I feel like I have a true understanding of how it all works. You also made it very easy to follow along with this is not always the case. Most of the time I end up more confused then when I started.
I just wanted to let you know that it is appreciated.
Thank you –
Thanks so much Heidi, really glad that you found my post helpful 🙂
Pls be my mentor to be an affiliate, l am aretiree but want to still be active as a blogger or affiliate. You are a good facilitator.
I’d be happy too, you can sign up for my free affiliate marketing course (the details are at the end of the post above).